Suggested Learning Intentions
- To explore the properties of angles where a transversal crosses parallel lines
- To make connections between line and angle forms in artwork and line and angle properties in mathematics
- To use properties of lines and angles to discuss visual elements in artworks
Sample Success Criteria
- I can identify angles using mathematical language used in relation to a transversal crossing parallel lines
- I can use technology to create visual representations of angle problems
- I can identify parallel lines in two-dimensional images
Before starting this stage, it is recommended students complete the 'Origami' task in the previous stage (Assemble your angles). The fold lines created in this task can help students visualise the terms 'parallel' and 'transversal'.
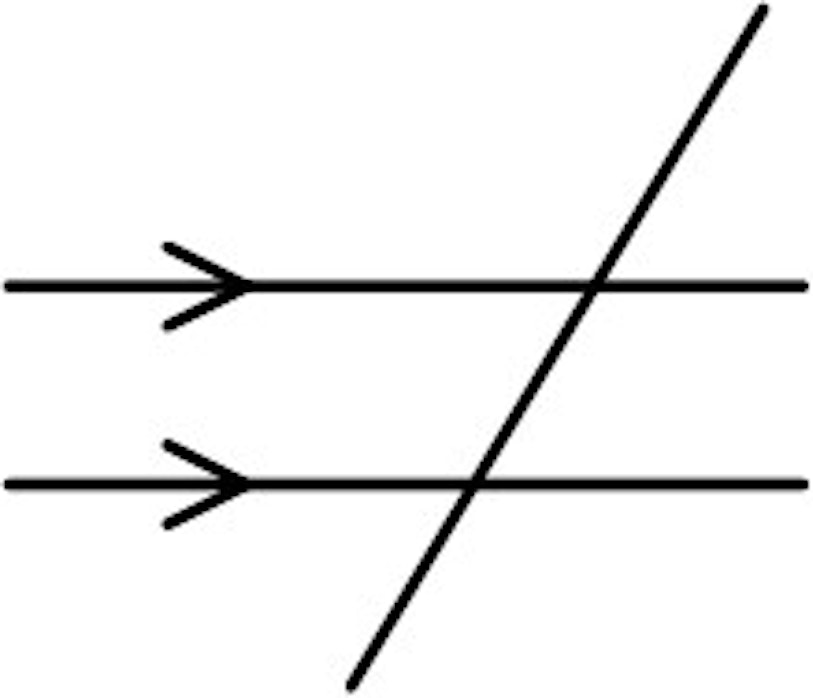
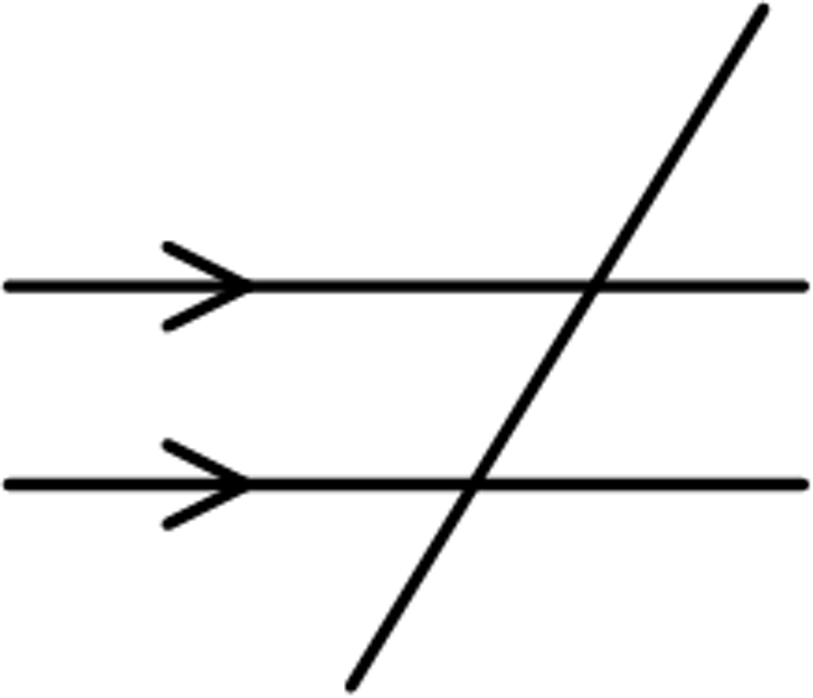
Display an image of two parallel lines being crossed by a transversal. At this point do not introduce the formal language of transversal to students.

Students recreate the same image using a digital geometry tool such as GeoGebra.
- Draw a line.
- Add a parallel line.
(Encourage students to explore ways to ensure their lines are parallel before providing prompts. Opening the ‘more tools’ menu provides a ‘parallel line’ tool.) - Cross them both with a third line.
The angles created will be used during the Go deeper phase of this stage. Students should print a copy of their work and store it for later use. If students ask about the angle of the diagonal give an answer that is likely to result in a wide variation between students, such as ‘Choose an angle between 0 and 360 degrees’.
Extend students by asking them to use Robocompass to complete the same task using coding. The command ‘line’ can be used for this task. Pressing the 'play’ button will allow students to see the image they have created drawn with a pencil and ruler.
Facilitate a discussion about what mathematics students think is addressed in the images they have created. Invite students who completed the extension to discuss which of the two digital tools is most accurate, easiest to use or shows the mathematics most clearly. Students might choose to show their Robocompass animations to their peers.
1. Parallel
Provide students with copies of Barak’s artwork and the Lake Condah Cloak (available in Materials and Texts). William Barak was a Wurundjeri man and is known in part for his artworks which depict ceremony. Facilitate a discussion about the mathematical words that describe the types of lines Barak used on the possum skin cloaks. In particular, ask students whether parallel lines have been used. Guide the class to a shared understanding of the term parallel.
To deepen this discussion, the Australian Institute of Aboriginal and Torres Strait Islander Studies and Museums Victoria provide information about the traditional use of possum skin cloaks. These sources explore the markings used by Aboriginal and Torres Strait Islander people on possum skin cloaks and may help students understand what the lines in Barak’s art might represent. You might use the resources to further your own knowledge, or have students explore one of the resources each and use a jigsaw protocol to report back to a group.
Students may enjoy extending this activity by exploring more contemporary artworks by Owen Yalandja, David Milaubuma or one of the range of artists who contributed to Meerreeng-an Here is My Country.
Provide students with copies of Kandinsky’s artworks (available in the Materials and texts section above). Ask students to use the shared definition of parallel to find a place in one of Kandinsky’s artworks where parallel lines are used. Provoke students to think about proof and reasoning by asking them to show how they can be sure the lines they have identified are parallel. Ask students to present a pair of angles that are not parallel and give a justification for their answer.
It is likely that students will initially measure the space between two lines and check that it remains the same at different points. More information on teaching counter examples can be found in the Literacy Teaching Toolkit.
Explicitly demonstrate to students how transversal lines and the congruent angles created can help identify parallel lines.

- Using an arrow symbol, mark two lines on one of the artworks that you will check to see if they are parallel. They should have another straight line that intersects with both.
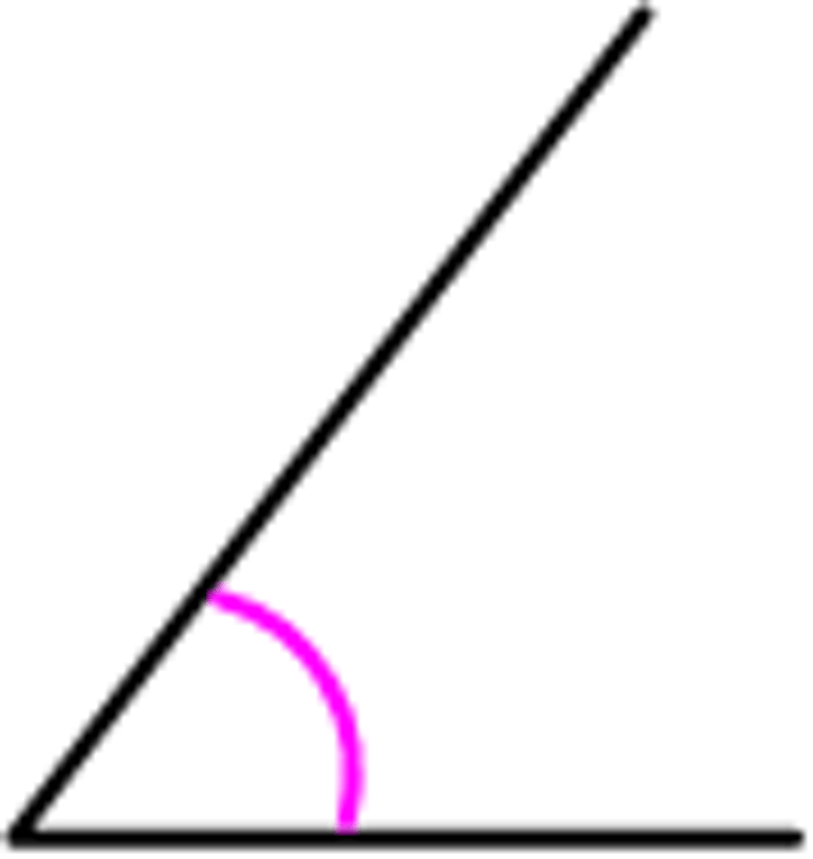
- Using an arc, mark two angles in the same position at the intersection between the transversal and each of the lines.
- Use a protractor to measure the two marked angles. If the lines are parallel the angle the transversal cuts them at will be congruent.

Through this teaching, the terms parallel, transversal, and congruent should be explicitly defined. Add to the class word wall for later reference.
2. Angle Match
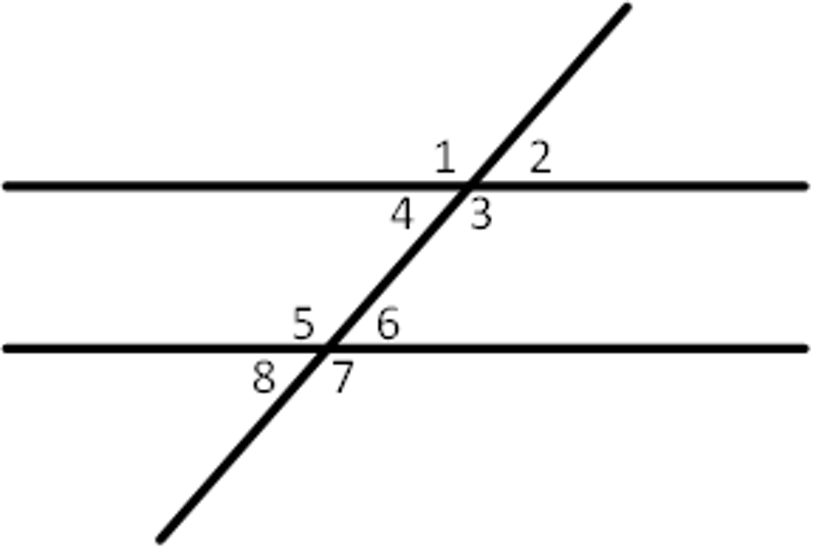
Students use the printed copy of their angle images from the Get started phase of this stage. Model a labelling system for the angles, working in a systematic way, such as the one shown here.

Students cut out the angles made as accurately as possible. Students should also label each piece so they can be easily sorted. Ask students to use only angle 1 and find anyone in the class who has made piece 1 the exact same size. Explicitly tell students that accuracy is important in this task; there should be very few (if any) exactly matching angles.
Ask students to return to the eight angles they cut out earlier. Ask students to group together any of their angles that match when laid over the top of each other. Students work individually or with someone else who has the same angle size.
Enable students who would benefit from working together by providing them printouts of the same pair of parallel lines and transversal.
Facilitate a discussion about what students notice.
Students should notice that angles 1, 3, 5 and 7 in this labelling system are identical and 2, 4, 6 and 8 are identical but different to the first set. Formal language is introduced in the next activity.
3. Transversal city puzzles
Puzzle 1 - Artown
Provide students with a copy of the Artown Map and angle property cards (available in the Materials and texts section above). Read the first clue to the whole class.
The hospital and the restaurant are on alternate exterior angles at Barak Road, Mondrian Lane and Uccello Street.
Model how to interpret the clue using think-aloud strategies. Read the clue then repeat the words ‘alternate exterior angles’, commenting that you are a bit confused about which term that is, and then demonstrate how to double check its meaning by reading the angle property card.
Students write the names of the buildings in place on the map, using pencil so they can move any buildings that need adjustment during the task.
Invite students to work through the rest of the clues to draw Artown at their own pace. Students who reach the final clue and have arranged the buildings on the map may enjoy drawing the buildings using the orthogonal or isometric drawing techniques presented in the Assemble your Angles stage.
Enable students to engage in this activity by working with them to draw visual representations to match the sentences on the angle property cards.
Puzzle 2 - Geometricity
Students consolidate this learning through an additional exposure and design a layout for Geometricity using the clues provided. Students will need to choose how many streets to add to their town. Encourage students to adjust their layout as they go.
There are many answers to this challenge depending on where students set out the streets. Co-construct a rubric with students to give feedback about each other’s work for use as a formative assessment. This could include criteria relating to accuracy of placement of buildings, use of creative layout, street naming and presentation quality.
Extend students by asking them to improve Geometricity by adding more landmarks. Ask students to write a new instruction on the town planning list for each landmark they include. Encourage students to use the angle properties and geometry terminologies in inventive ways.
Additional problems can be found in the Mathematics Curriculum Companion.
1. Dance, dance transversal
This activity is inspired by Dance, Dance, Transversal on algebrainiac.
Download the video or slideshow version of the dance, dance transversal game, adding music that will engage students in your class. Alternatively, play music in the classroom as the slideshow plays. The
slideshow can be edited then exported as a new video. Use the animations tab to change the order of the moves or the speed.
Each student uses masking tape to stick two parallel lines and a transversal on the classroom floor. Play the Dance, dance transversal video on a large screen. If space is limited, consider using a smaller number of positions and having students take turns.
As each coloured box rises into the outlined area students should jump and land their feet in the position indicated. For example, when the red corresponding box reaches the top, students should use their feet to show any pair of corresponding angles at the intersections. When the yellow parallel box reaches the top, students should jump with one foot on each of the parallel lines. When the green transversal box reaches the top, students should jump with both feet along the transversal line.
It can be useful to play this game with half as many sets of lines as students in the class. Students can work in pairs to keep track of each other’s score or provide feedback to each other to quickly change if incorrect.
Enable students who are challenged by recalling the terms quickly by:
- editing the slideshow to move more slowly or running the video in slow motion,
- labelling the slideshow with an image of the foot placement that matches each term, or
- having a caller who reads the moves aloud. This will allow students to look at their feet to choose placement on the lines without needing to also read quickly.
Refer to the mathematical vocabulary rather than the colours used on the slideshow, as this will distract students from learning the mathematical terminology.
Extend students by having them edit the slideshow to include extra vocabulary that can be shown on the lines or with arm motions rather than feet.
Ask students to expand their visual maths wall created during the Reflect and Consolidate phase of the Playing with Polygons stage. Provide a list of key terms that students should include on their wall to guide their thinking towards the most important vocabulary words. These may include: 'corresponding', 'alternate', 'co-interior', 'vertically opposite', 'parallel' and 'transversal'.
Australian Institute of Aboriginal and Torres Strait Islander Studies, 2017. A Possum Skin Cloak. [Online]
Available at: https://aiatsis.gov.au/exhibitions/possum-skin-cloak
[Accessed 15 March 2022].
Barak, W., 2012. William Barak, Figures in possum skin cloaks, 1898. [Online]
Available at: https://commons.wikimedia.org/wiki/File:William_Barak_-_Figures_in_possum_skin_cloaks_-_Google_Art_Project.jpg
[Accessed 15 March 2022].
Desmos, n.d. Desmos Geometry. [Online]
Available at: https://www.desmos.com/geometry
[Accessed 15 March 2022].
Desmos, n.d. Lines, Transversals and Angles. [Online]
Available at: https://teacher.desmos.com/activitybuilder/custom/56fd6cb1bfa5cb4206f88f5f
[Accessed 15 March 2022].
Desmos, n.d. Polygraph: Angle Relationship. [Online]
Available at: https://teacher.desmos.com/polygraph/custom/560c53f831e47ee40c824ed0
[Accessed 15 March 2022].
Desmos, n.d. Puzzling It Out. [Online]
Available at: https://teacher.desmos.com/activitybuilder/custom/5d896650e796e00c23556d76
[Accessed 15 March 2022].
Hinchliffe, J., 2019. The timeless and living art of possum skin cloaks. [Online]
Available at: https://museumsvictoria.com.au/article/the-timeless-and-living-art-of-possum-skin-cloaks/
[Accessed 15 March 2022].
Jessica, algebrainiac1, 2013. Dance, Dance, Transversal. [Online]
Available at: https://algebrainiac.wordpress.com/2013/10/22/dance-dance-transversal/
[Accessed 15 March 2022].
Kandinsky, W., 2014. Wassily Kandinsky, 1923, Composition 8. [Online]
Available at: https://commons.wikimedia.org/wiki/File:Vassily_Kandinsky,_1923_-_Composition_8,_huile_sur_toile,_140_cm_x_201_cm,_Musée_Guggenheim,_New_York.jpg
[Accessed 15 March 2022].
Kandinsky, W., 2019. Wassily Kandinsky, Black and Violet, 1923. [Online]
Available at: https://commons.wikimedia.org/wiki/File:Wassily_Kandinsky_Black_and_Violet.jpg
[Accessed 15 March 2022].
Kandinsky, W., 2019. Wassily Kandinsky, Circles in a Circle, 1923. [Online]
Available at: https://commons.wikimedia.org/wiki/File:Wassily_Kandinsky_Circles_in_a_Circle.jpg
[Accessed 15 March 2022].
Koorie Heritage Trust, 2010. Meerreeng-an Here Is My Country. [Online]
Available at: https://cv.vic.gov.au/stories/aboriginal-culture/meerreeng-an-here-is-my-country/
[Accessed 15 March 2022].
National Gallery of Victoria, n.d. David Milaybuma. [Online]
Available at: https://www.ngv.vic.gov.au/explore/collection/artist/198/
[Accessed 15 March 2022].
National Gallery of Victoria, n.d. Owen Yalandja. [Online]
Available at: https://www.ngv.vic.gov.au/explore/collection/artist/66/
[Accessed 15 March 2022].
Robo Compass, n.d. Robocompass Teach and Learn. [Online]
Available at: https://robocompass.com
[Accessed 15 March 2022].
Social Psychology Network, 2014. Jigsaw Classroom. [Online]
Available at: https://www.jigsaw.org/#steps
[Accessed 15 March 2022].
State Government of Victoria (Department of Education and Training), 2020. Investigating conditions for parallel lines: Transversal Puzzle. [Online]
Available at: https://fuse.education.vic.gov.au/MCC/CurriculumItem?code=VCMMG265
[Accessed 15 March 2022].
Other stages
1. Playing with Polygons
EXPLORESuggested Learning Intentions
- To develop vocabulary about the angle and side properties of triangles and quadrilaterals
- To classify triangles according to their side and angle properties and describe quadrilaterals
Sample Success Criteria
- I can describe a polygon using its properties
- I can use side and angle properties of triangles and quadrilaterals to describe their differences and similarities
- I can identify polygons and non-polygons within a two-dimensional image
- I can explain and justify my thinking using manipulatives
2. Assemble your Angles
EXPLORESuggested Learning Intentions
- To investigate the way that angles in shapes relate to each other
- To manipulate angles to improve understanding of angle properties in polygons
Sample Success Criteria
- I can estimate the size of an angle when turning an object
- I can identify polygons and angles made when lines cross
- I can prove the sum of the internal angles in a triangle or quadrilateral
- I can use a range of manipulatives to explain and justify my solutions
4. Untangle Polygons and Angles
EXPLORESuggested Learning Intentions
- To develop logical reasoning to solve problems involving lines, angles, and polygons
- To articulate mathematical reasoning through providing justifications of steps in problem solving
- To use visual representations to support problem solving
Sample Success Criteria
- I can provide justifications for mathematical reasoning when problem solving
- I can use a range of manipulatives to explain and justify my thinking
- I can match justifications to a visual representation of a problem
- I can reference mathematical facts when proving an answer in problem solving